- Sale
- 360 Degree Photography
- Battery and Battery Grip
- Backgrounds Even Color
- Backgrounds with Print
- Background Systems
- Cameras
- Camera Accessories
- Camouflage
- Continuous and Videolight
- Filters, Converters and Rings
- Photo frames
- Clamps and Adapters
- Cases and Bags
- Bulbs
- LED Lighting
- Magnifying Glasses
- Macro Photography
- Microphones
- Microscopes
- Night Vision Devices
- Shooting Tables and Tents
- Outdoor and Survival
- ID Photo Systems
- Flash Umbrellas
- Printers
- Reflectors
- Reflectors and Snoots
- Riflescopes
- Rigs Sliders and Stabilizers
- Camouflage Hides
- Smartphone Accessories
- Soft Boxes and Beauty Dishes
- Speedlite Camera flashes
- Spotting scopes
- Tripods and Ballheads
- Strobist
- Studio Accessories
- Studio Flashes and Kits
- Tecco Ilford Print Media
- Telescopes
- Trigger Sets
- Binoculars
- Thermal Imaging
Payment methodes:
|
||||||
Reviews:NewsletterPacked with tips, promotions and exclusive discounts! |
||||||
Follow Benel:
|
Product photography
Due to the increase of online shopping through the opening of web shops, product photography has become ample in providing the consumer with the most accurate representation of the product they see online. There are many ways to make this possible. Whether it be through a number of photographs or through the use of 360 degree photography, product photography can be done effectively through the application of three steps.
1. Appropriate Lighting
2. Appropriate Backdrop
3. Reflection Prevention
Step 1: Choice of Appropriate Lighting
The first step for the making of product photographs is the choice of appropriate lighting. For the lighting or exposure, you can choose between a studio flash and continuous lighting.
Studio Flash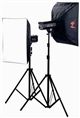
Studio flash units produce a short, high light output compared to continuous light. A flash light can be sold separately but most of the time they are built into the camera. The freestanding studio flash units are generally used in studios due to their high light output. This gives the studio flash an advantage over the continuous flash, which is of a similar price. A continuous lighting system with the same light output as the studio flash is significantly dearer. Conversely, a disadvantage of the studio flash system is its higher setup complexity. It is essential that you have some knowledge about the ISO, aperture and shutters speed setup to achieve the best possible photo. These are however, quite easy techniques to learn.
Continuous Lighting
Continuous light is made up of many daylight lamps, which generally produce a natural, white light similar to a colour temperature between 5000k and 5500k. The biggest difference between continuous and flash light is that, as the name suggests, continuous lighting requires the lights to be on at all times during use where as a flash light produces a burst of lighting when needed. “What you see is what you get” with continuous lighting. When you look at your setup, you view the subject exactly how it will appear in the photo. In addition, you can record product videos with continuous light, which is not possible with a studio flash light.
Step 2: Choosing the Right Backdrop for your Product's
It is important to use the correct background when shooting products to portray your item as accurately as possible. To do this, you have the choice of using a photo tent, photo table, background system or a complete photo studio. It is also possible to use a plain sheet of white paper for smaller objects but the challenges in doing so will become apparent almost straight away. Shiny objects are extremely susceptible to reflection and because of this, your photos won’t turn out nicely.
Photo Tent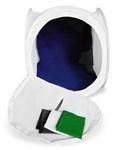
Also known as light tents, photo tents are used to distribute the light evenly over the product, eliminating the ability to see the location of light source. These tents are available in a range of sizes and are most suitable for products that are small and shiny in nature, such as jewelry and glassware.
Photo Table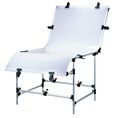
A photo table can be used to capture an unshaded photo. It has a semi-transparent plate where you can attach lights (studio flashes or continuous light) underneath. By illuminating the plate, the product will display minimal shadow.
Background System
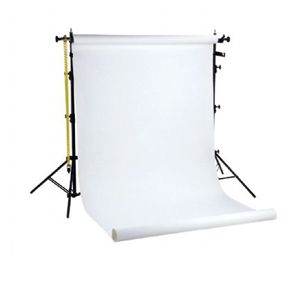 Obviously it is impossible to shoot big or heavy products in a photo tent or on a photo table. A background system is therefore used to shoot such items. These systems are sold separately or in a kit (paper/vinyl roll, tripods and hanging materials included). Such paper or vinyl rolls are available in two sizes, 1.38 or 2.75 meters wide.
Photo Studio
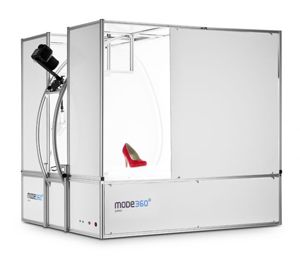 It is also possible to purchase a photo studio complete with built in lighting. The photo studio is controlled by software on your computer or laptop. These studios offer 360-degree rotation allowing you to capture your product perfectly from different angles. To learn more about 360 Degree Photography, please click here.
Step 3: Eliminating Reflection
The third and final step to ensure the upmost quality if your shots, is the elimination of reflection or glare. Sometimes when shooting products, you will come across items that reflect the light or show things in the photo that direct the attention away from the product you’re trying to shoot. There are a number of ways to eliminate this issue. These are listed below.
Light Scattering
Light scattering is a technique used to disperse and remove the light from a focal point. A softbox or translucent flash umbrella can be used to achieve this technique. Further, a roof top diffuser can be purchased as an additional accessory for a photo table to eliminate the reflection in your photographs.
Polarizing Filter
A Polarizing filter significantly reduces the light reflection through a filtration technique.
Anti-Reflection Spray
It is also possible to use an anti-reflection spray to reduce the reflection depicted in a photo. The spray is safe to use on most surfaces, including plastic (it is advised to spray a small section of the object with the spray to ensure there is no negative reaction). The spray can be wiped off the object with a clean, dry cloth, after use.
10 Tips to Optimize your Product Photographs
In order to optimize your product photos, we have developed a list of 10 tips on how to do this. This list can be found here.
![]()